
Selenium is a very handy framework for testing web applications and it is also helpful in automating repetitive tasks on the web. I recently used Selenium WebDriver in a python script to help my wife with a college course she was trying to get into. It was a required course but students had filled all course seats and she could only wait for students to lose their seats after the payment deadline.
So she did what anyone else would do. Go to the page and search for her course, refreshing multiple times throughout the day, hoping to see an OPEN status. The moment I was aware of what she was doing, I immediately said “I can automate that!”. I then went to work to write a script.
The goal of this article is to give a simple introduction into the power of using selenium for work and everyday life. I’ll go over how I leveraged selenium to automate querying the course seat status.
You can find the project on my GitLab page for a more in-depth look at what my script does. Explaining the script or the email feature is out of scope of this article. -> https://gitlab.com/CompSciMaj13/open-seat-notifier
I’ll be referring to the selenium specific code in cbc_checker.py.
Firefox Headless Browser
I wrote a FFWebDriver context manager class, which is just a wrapper around the Selenium Firefox WebDriver. It inherits from a BaseWebDriver class that takes care of returning the WebDriver object and exiting the WebDriver once out of scope. Using with FFWebDriver() as driver: simplifies the code without the need to set the same options or remember to quit every time I need the WebDriver.
class BaseWebDriver:
    """Base class WebDriver"""
    def __init__(self) -> None:
        self.driver = None # type: webdriver

    def __enter__(self) -> webdriver:
        return self.driver

    def __exit__(self, *exc_info) -> None:
        self.driver.quit()


class FFWebDriver(BaseWebDriver):
    """Firefox webdriver class"""
    def __init__(self) -> None:
        super().__init__()
        options = webdriver.FirefoxOptions()
        options.set_headless(True)
        self.driver = webdriver.Firefox(firefox_options=options)
        self.driver.implicitly_wait(30)
Writing a wrapper class also makes it easy to add other WebDrivers like a Chrome CWebDriver class in the future.
The lines to pay attention to are 18 – 20. In order to use the firefox browser in it’s headless mode, the set_headless option must be set to True. Otherwise, the firefox’s GUI will open when the script is executed. The firefox webdriver is then instantiated on line 20 passing the options variable to the firefox_options parameter.
Selenium WebDriver
In __get_status, the driver instantiates and queries the website for the status of the course.
    def __get_status(self, item_num: int, class_quarter: str, class_year: int) -> str:
        with FFWebDriver() as driver:
            driver.get(self.search_url)
            driver.find_element_by_id("ctl00_plhContent_lstYRQ").send_keys("{} {}".format(class_quarter, class_year))
            driver.find_element_by_id("ctl00_plhContent_txtItem").send_keys(item_num)
            driver.find_element_by_id("ctl00_plhContent_btnSearch").click()
            try:
                status = driver.find_element_by_id("ctl00_plhContent_gvSchedule_ctl02_lblStatus").text
            except NoSuchElementException:
                print("There are no classes for that search criteria.")
                exit(1)
            return status
driver.get(self.search_url) opens the headless browser to the course schedule page. If you try this yourself and leave out options.set_headless(True), a Firefox GUI browser will open and you can watch the commands in real-time.
find_element_by_id finds web elements based on their id. For example on the above code on line 5, it finds the Quarter drop-down element and sends the quarter and year Fall 2018. Same for the Item Number text-box element on line 6 and the Search button on line 7. I wrapped the last element in a try except block that will try to grab the status and raise an exception if the course’s status element is not found.
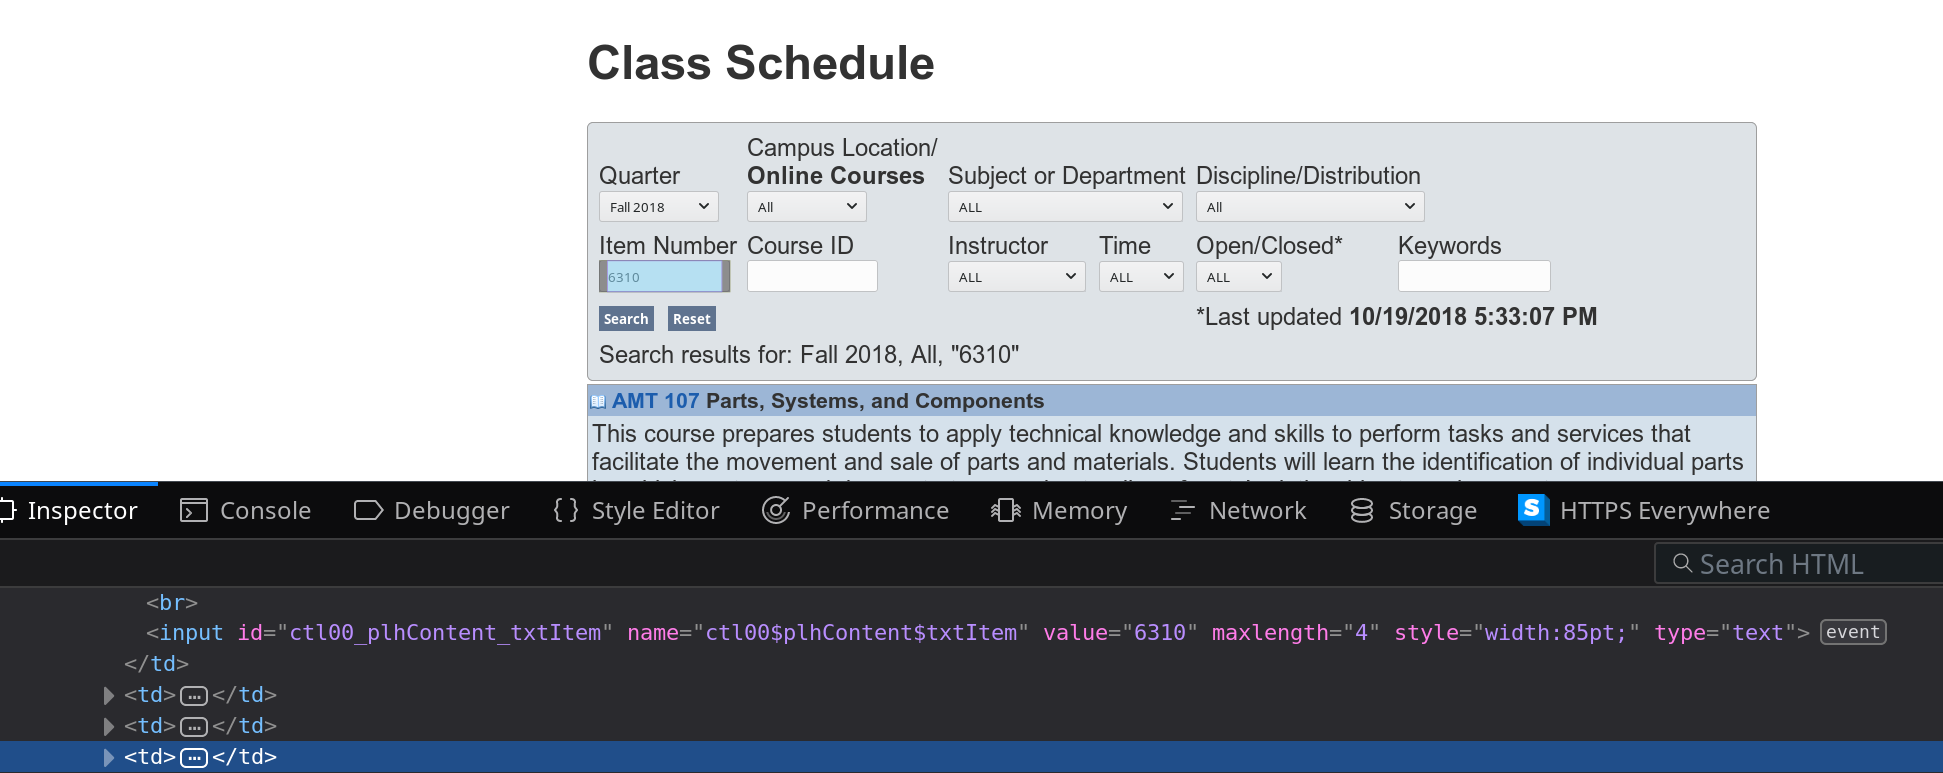
An element’s ID is found in the browser by right clicking on it and selecting Inspect Element. You’ll see something similar in the screenshot below for the Item Number text-box element. Pass the string after id= into the find_element_by_id method. The ID for the Item Number text-box element is "ctl00_plhContent_txtItem".
I used the send_keys method to enter text on a text-field and drop-down and used it to enter the item_num variable into the Item Number element as well as the class_quarter and class_year variables into the Quarter element.
The click method unsurprisingly clicks buttons or anything that is clickable. In this case clicking the Search button.
Calling .text on an element will return its text attribute. The screenshot below shows me inspecting the CLOSED status for its ID which was "ctl00_plhContent_gvSchedule_ctl02_lblStatus".

Summary
It’s really that simple. One downside is if the IDs for the elements were to change, I would need to update the script with the new IDs. But as I showed above, its trivial to find them.
This was a very fun hobby project that also actually helped my wife know as soon as a seat opened in the course. Once she received the email, she went to the college and enrolled! She was very thankful!
I would suggest you to open a python shell and start playing around with selenium. Opening URLs, finding elements, and interacting with them. It’s the best way to get experience and you too will be able to use selenium for those annoying tasks online.
In this article, I went over using the Firefox headless browser, and the following selenium methods and variables:
get– Opens the browser to the given URLfind_element_by_id– Finds an element on the page by the given element IDsend_keys– Sends text to an elementclick– Clicks an elementtext– Get the text attribute of an element
To read more into the Selenium WebDriver, follow these links:
Loading Likes...